Creating a new browser Profile in DICloak requires advanced settings for the browser Profile, which can comprehensively and precisely control the simulated browser Profile. “Default Startup Pages” facilitates quick access to the target page; “Data Sync” ensures data consistency and facilitates multi-device collaboration; “Clear local cache” allows Custom of whether to clear local data before opening the Profile each time; “Browser Settings” means that when opening the Profile, the browser Profile will take effect according to the selected settings; “Multi-Open Profile” allows multiple members to open the current Profile simultaneously; “Extension Configuration” can add functional plugins, and when opening the Profile, the corresponding extensions will be automatically installed. The following is a detailed introduction.
1. Advanced
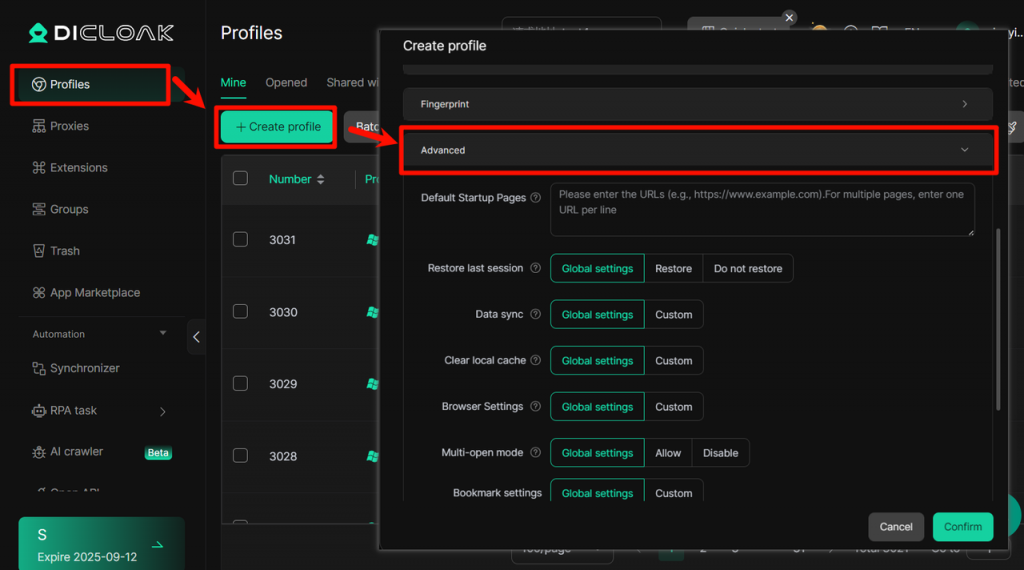
- Open and log in to the DICloak software. In the left navigation bar, you can find [Profiles], then click the [Create Profile] button to enter the “Create Profile” interface, where you can find the “Advanced”.
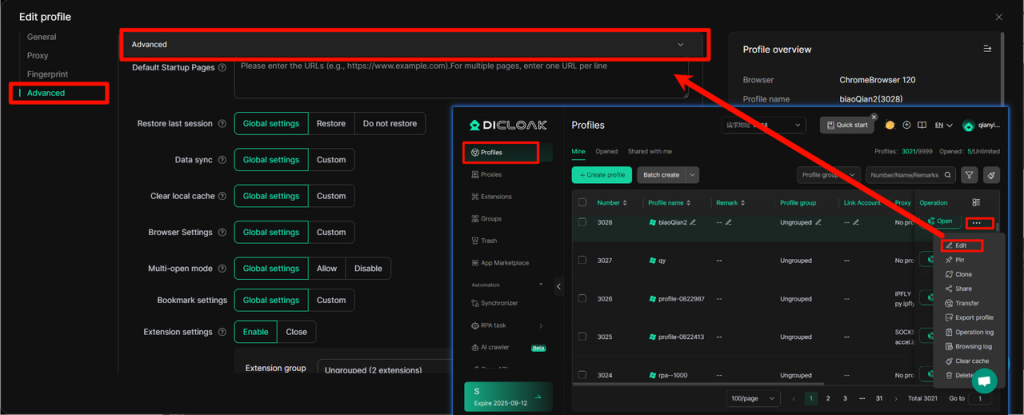
- In the Profile list, select the specified Profile, click the [Expand] button, then click the [Edit] button to enter the “Edit Profile” interface, where you can also find the “Advanced”
2. Advanced Settings Function
2.1 Default Startup Pages
Enter the URL here, and the browser will automatically visit the set webpage each time the simulation Profile is launched.
2.2 Restore last session
- Global Settings: Run according to the browser’s default method.
- Custom: You can choose one of the following options:
- Restore: The profile will reopen the webpages you were viewing last time.
- Do not restore: Start with a blank tab or default page.
2.3 Data Sync
- Provides “Global Settings” and “Custom” options, allowing users to choose which data types to synchronize between devices. When closing the Profile, the selected data items can be synchronized to the cloud. When opening the Profile across devices, data will be synchronized from the cloud to the new device, thereby enabling multi-person cross-device collaboration.
- [Extension Data Sync]: In “Data Sync”, select [Custom], check [Extension Data] to enable the “Extension Data Sync” feature. This allows the data from extended tools to be synchronized to the cloud, so that when opening the Profile across devices, the original Extension Data can be synchronized (e.g., maintaining the logged-in state of accounts within the extension)
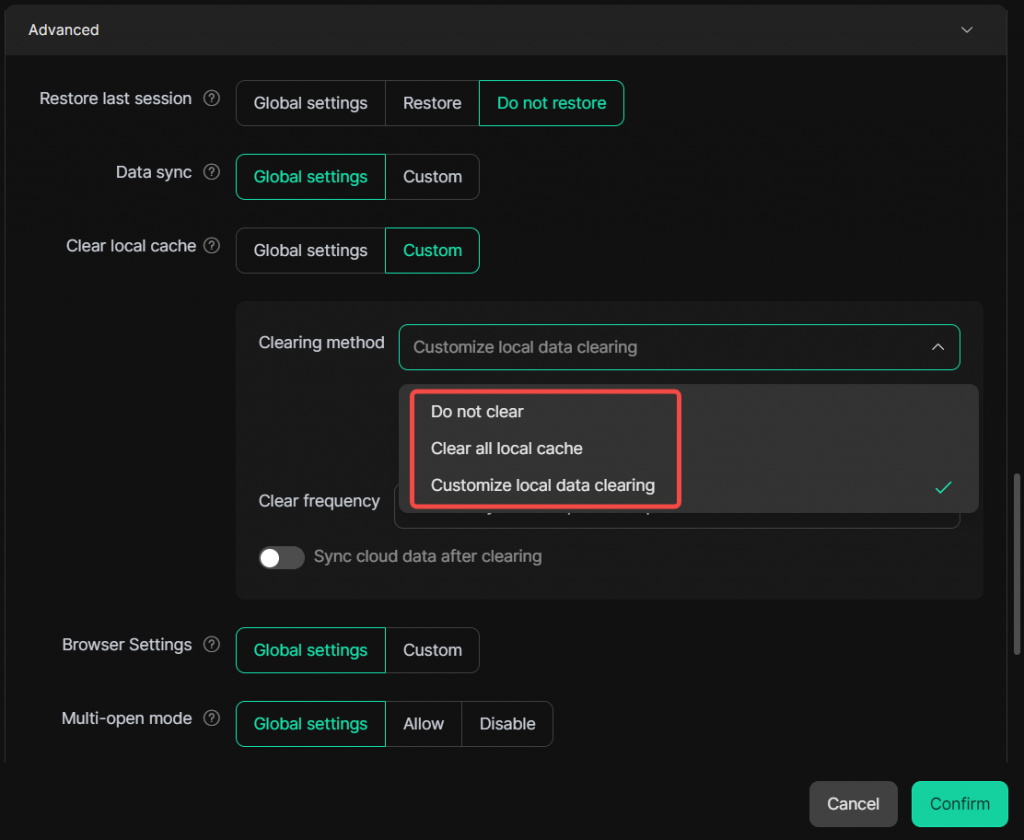
2.4 Clear Local Cache
After enabling the 【Clear Local Cache】 function, you can flexibly set the scope of cache cleaning. This allows automatic clearing of the profile’s local cache data when it is launched.
Usage Process:
- Go to [Profiles], click “Create Profile” / “Edit Profile”, and enter the “Advanced Settings” interface.
- Select [Custom] under “Clear Local Cache”.
- Choose the “Clearing method”, with the specific options below:
- Do Not Clear: Does not clear the local profile data.
- Clear All Local Cache: Clears all types of local cache for this profile.
- Custom Clear Local Data: Automatically clears the selected types of local cache data (Cookies, Local Storage, IndexedDB, History, Cached images/videos, etc.)
- Choose the “Clearing frequency”, with the specific options below:
- Clear every time the profile is opened: Automatically clears local cache each time a member opens the profile.
- Custom clearing frequency: Automatically clears local cache at set intervals when a member opens the profile.
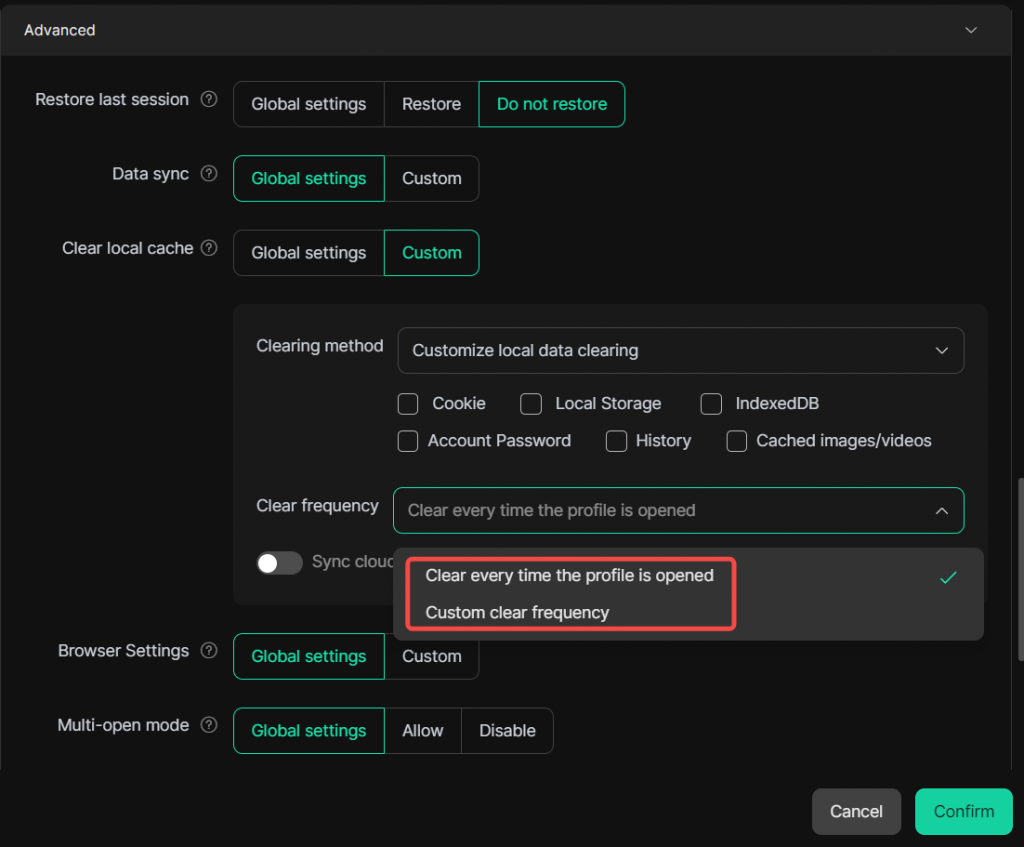
- [Sync Cloud Data After Clearing]: When checked, cloud data will be automatically synced after a member clears the local cache, ensuring members can use the platform accounts normally.
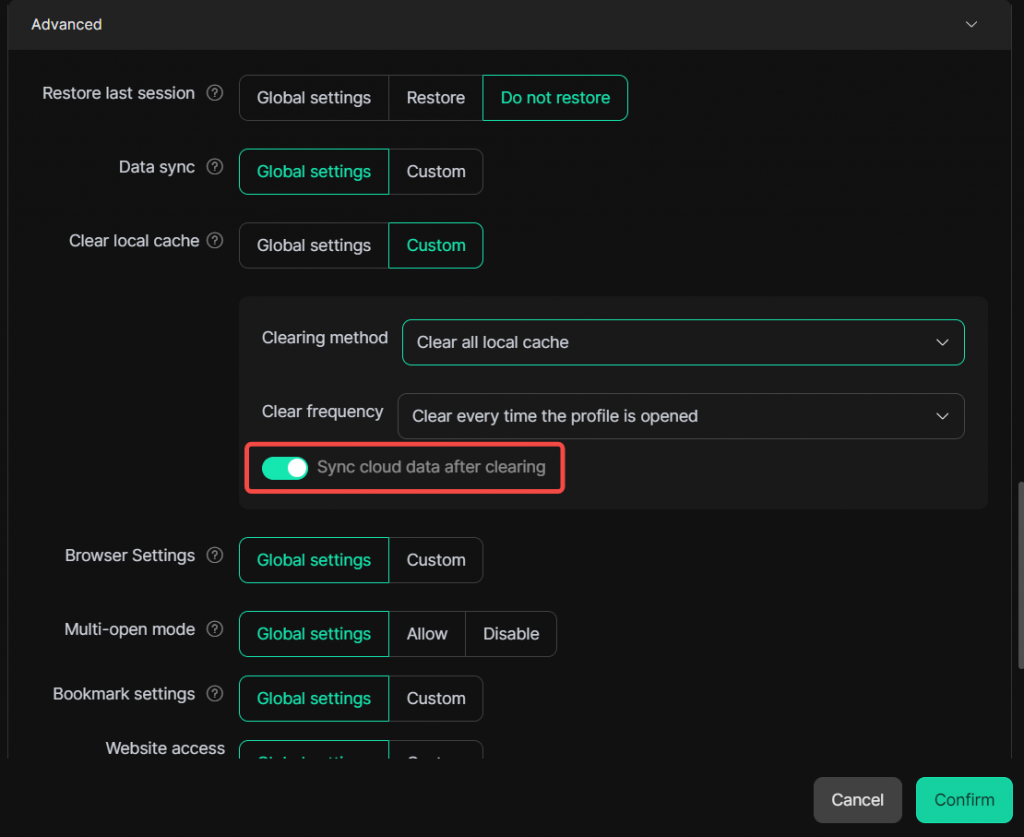
After confirming the information is correct, click [Confirm] to save the settings and return to the Profile List.
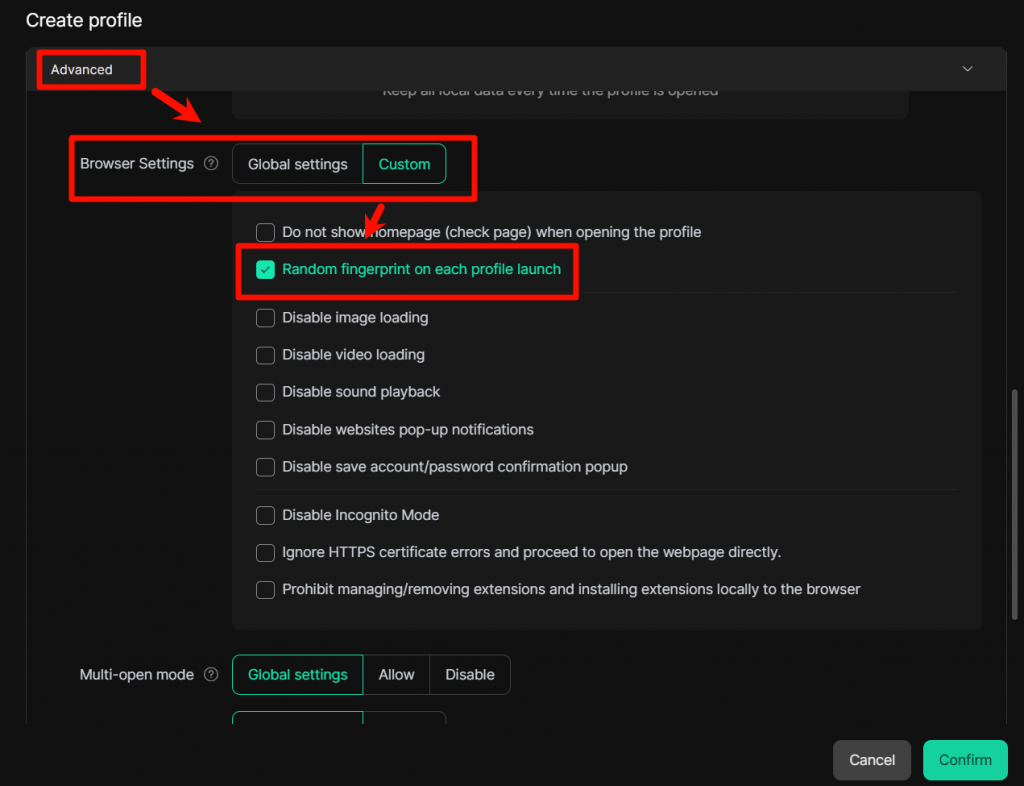
2.5 Browser Settings
When opening the Profile, the browser Profile will take effect according to the selected settings. It has two modes: [Global Settings] and [Custom].
- Global Settings:Run according to the browser’s default method.
- Custom: You can adjust parameters yourself to configure a personalized Profile. The specific parameters are as follows:
- Do not show homepage (checkpage) when opening the profile:When opening the Profile, do not display the website’s home page (detection page)
- Disable Functions: You can check the content or interactions to be prohibited from displaying, such as:
- Disable image loading
- Disable video loading
- Disable sound playback
- Disable websites pop-up notifications
- Disable save account/password confirmation popup
- Disable Incognito Mode
- Ignore HTTPS certificate errors and proceed to open the webpage directly.
- Prohibitmanaging/removing extensions and installing extensionslocallyto thebrowser
- Random fingerprint on each profile launch: .After enabling the [Random Fingerprint] function, the system will automatically change the browser fingerprint every time you open the same Profile. You no longer need to create multiple profiles to simulate different devices. This function is suitable for large-scale crawling scenarios. Just create an profile and automatically obtain new fingerprints every time the task is executed, effectively reducing the probability of being recognized by risk control and improving the efficiency and security of Data Acquisition.
- Enter [Profiles], click [Create Profile]/[Edit Profile], and enter the “Advanced Settings Interface”
- Select [Custom] in “Browser Settings”
- Check “Random fingerprint every time the Profile is opened”
- Click [Confirm] to save the settings and return to the “Profile List”
2.6 Multi-open mode
Through the “Global Settings” and the “Allow” and “Prohibit” options, when “Allow” is selected, multiple members will be allowed to open the current Profile simultaneously.
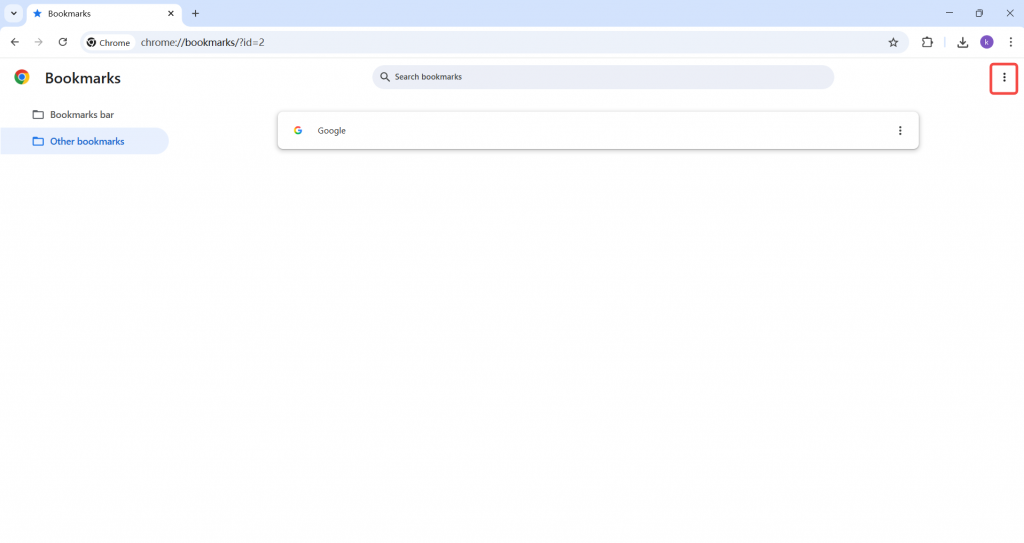
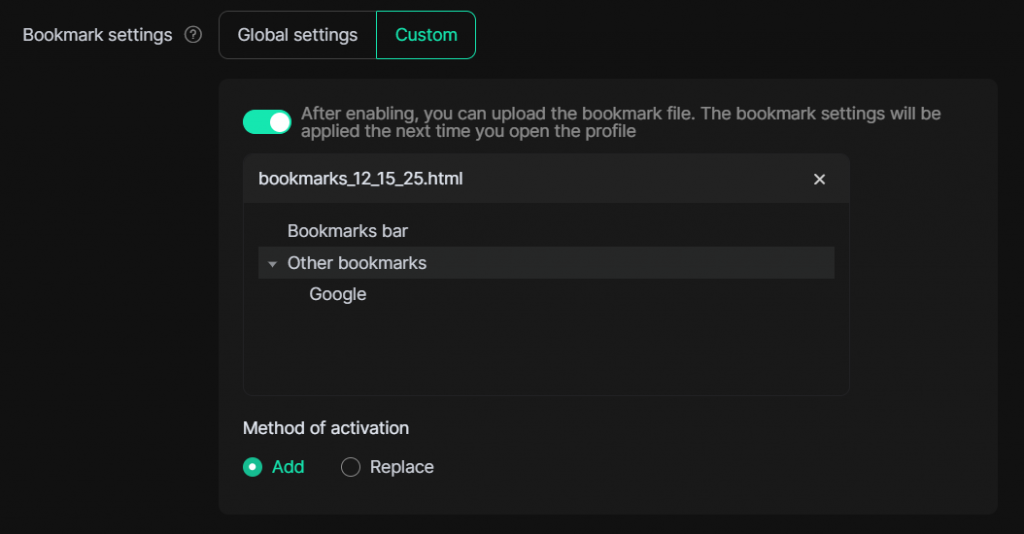
2.7 Bookmark Settings
you can upload the bookmark file (in HTML format). The bookmark settings will be applied the next time you open the profile. Below are the steps for exporting and uploading bookmarks:
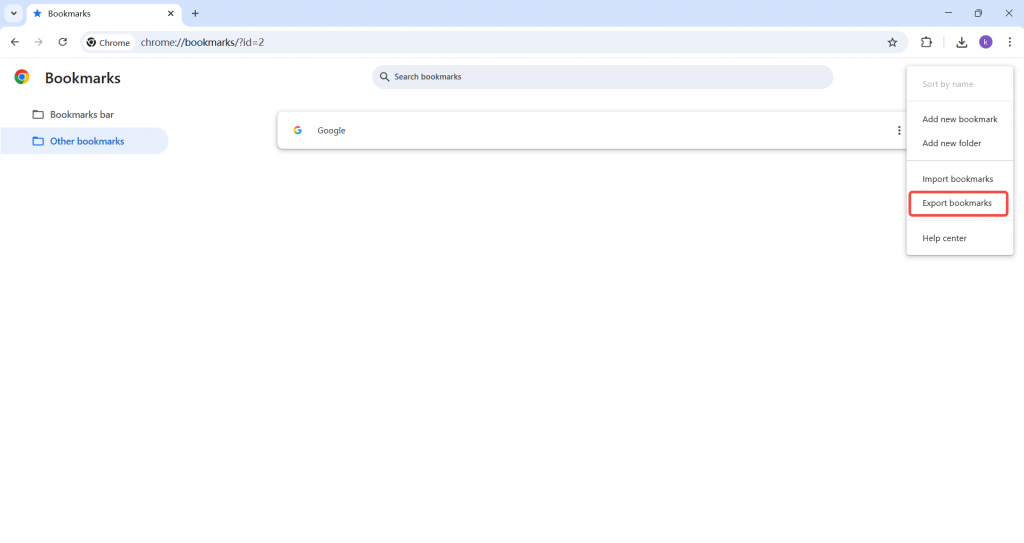
- Open the bookmark manager page in Chrome (chrome://bookmarks/), click the three dots in the upper-right corner, and select Export bookmarks.
- Upload the exported bookmark file in the Bookmark Settings section. The bookmark folders and included bookmarks will be displayed.
- Method of activation: Choose “Add” or “Replace”.
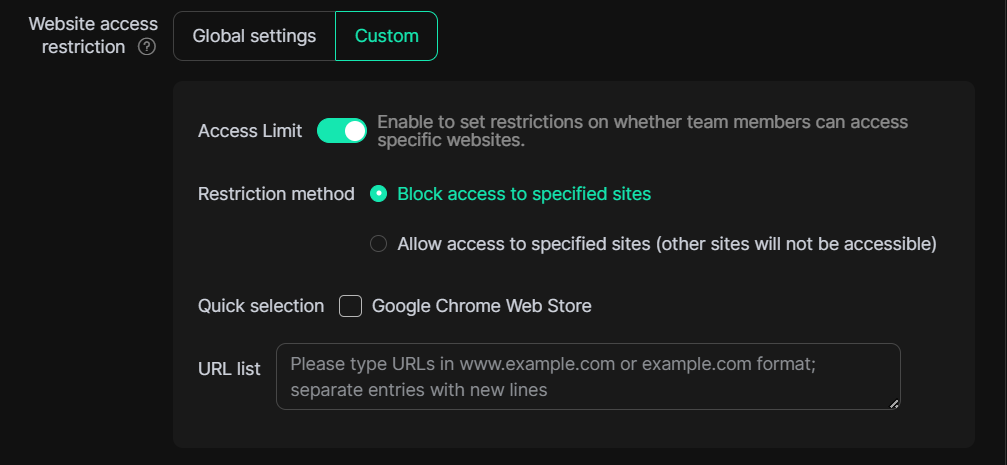
2.8 Website Access Restrictions
- Global Settings: Run according to the browser’s default method.
- Custom:
- Access Limit: Enable to set restrictions on whether team members can access specific websites.
- Restriction Method: Choose “Block access to specified sites” or “Allow access to specified sites (other URLs will not be accessible)”.
- URL List: Enter URLs in formats such as “www.example.com”, “example.com”, or “*.example.com”. Multiple entries can be added line by line.
2.9 Extension settings
You can choose “Enable” or “Disable”. After configuring the extension for the current Profile, the corresponding extension will be automatically installed when the Profile is opened.
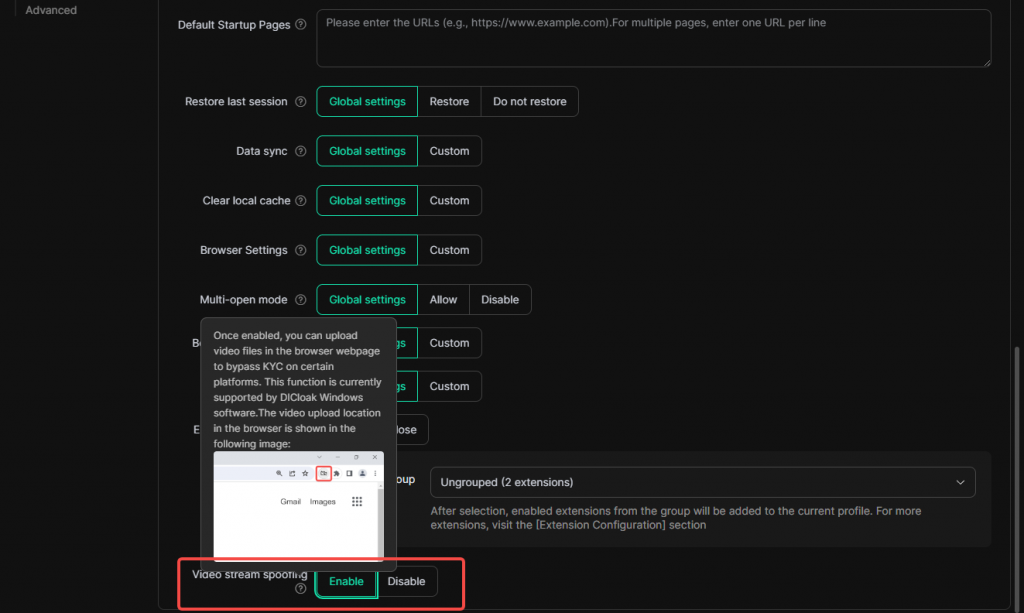
2.10 Video stream spoofing
Through this feature, you can easily bypass selfie verification when using accounts such as Facebook. Simply upload the verification video to quickly complete the verification, ensuring more efficient and smooth multi-account management.
Operation Steps:
- Enter the “Edit Profile” interface, click [Advanced Settings], and enter the editing interface.
- In the “Video stream spoofing” module, click the [Enable] button and then click [Confirm].
- Automatically return to the Profile list after successful startup.
- Enter the corresponding DICloak Profile, click the [Upload Video] button in the browser and select the corresponding video file, then click [Open] to complete the video file replacement function.