Below are the troubleshooting and solutions for four common causes of kernel decompression failure. Please troubleshoot them one by one according to the corresponding causes.
If the issue persists after trying the solutions below, please feel free to contact our customer service colleagues for troubleshooting:
一、Reason 1: Insufficient disk space on the computer
1.1、Taking the Windows operating system as an example
1.1.1、How to troubleshoot and confirm
- Check target disk space:
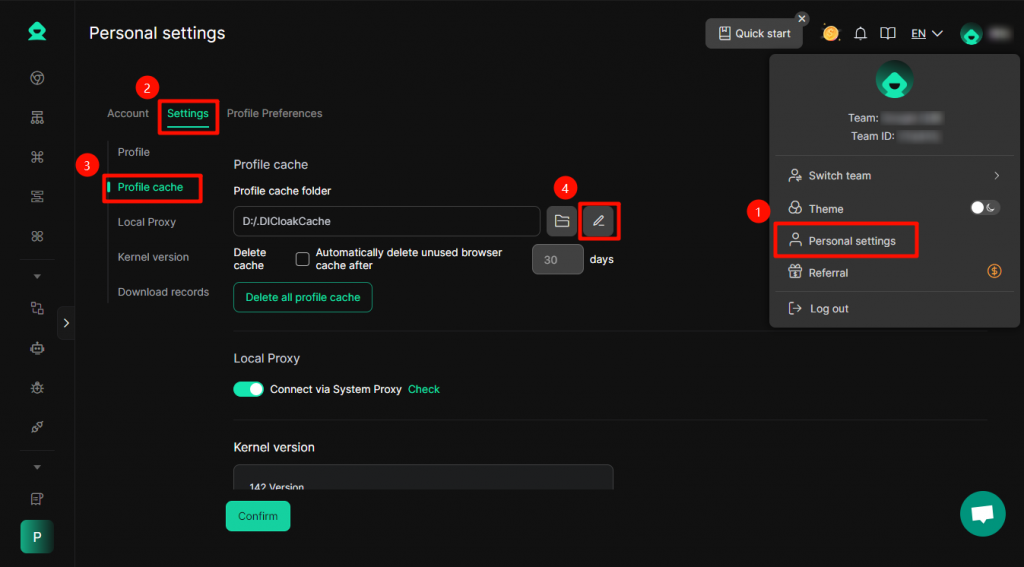
- Right-click on the disk corresponding to your Dicloak cache directory (usually Disk D or Disk C; you can view the cache directory in DICloak – Personal Settings)
- Select “Properties” to view the size of “Available Space”
- Key judgment: Is the available space less than 2GB? If so, it may lead to decompression failure
1.1.2、Solution
- Clean up disk space
- If using the disk cleanup tool for cache: right-click the disk → Properties → Disk Cleanup
- Clean up old files in the download folder
- Empty Recycle Bin
- Change installation location:
- In Dicloak – Personal Settings, change the Profile Cache – Cache Directory Path to another disk with sufficient space
After completing the above operations, you must first delete the kernel that failed to decompress ( view the tutorial below ), then try to open the DICloak software again, download the kernel, and it will automatically decompress after downloading
1.2、Taking the Mac operating system as an example
1.2.1、How to troubleshoot and confirm
- Check available disk space:
- Click the Apple menu (🍎) in the top-left corner of the screen → About This Mac → More Info/Details → Storage
- Key Judgment: Check if the “Available” Memory Space is less than 2GB
- Special Note: Even if space is shown, macOS may reserve local snapshots for Time Machine
1.2.2、Solution
- Delete some infrequently used software
- Empty the trash bin to free up memory space
- Use professional cleaning tools:
- CleanMyMac X
- DaisyDisk (Visual Occupancy View)
After completing the above operations, you must first delete the kernel that failed to decompress ( view the tutorial below ), then try to open the DICloak software again, download the kernel, and it will automatically decompress after downloading
二、Reason 2: Insufficient Memory Space on the Computer
2.1、Taking the Windows operating system as an example
2.1.2、How to troubleshoot and confirm
- Check Memory Usage:
- Press
Ctrl + Shift + Escto open Task Manager - Click the “Performance” tab → Check the “Memory” usage
- Key Judgment: Is the utilization rate over 100%? Or is the available memory less than 2GB?
- Press
2.1.3、Solution
- Release Memory:
- Close unnecessary programs, especially:
- Browsers such as Chrome/Firefox
- Video Editing/Large Design Software
- Game Program
- End background processes: End non-essential processes in Task Manager
- Close unnecessary programs, especially:
After completing the above operations, first delete the kernel that failed to decompress ( view the tutorial below ), then try to open the DICloak software again, download the kernel, and it will automatically decompress after downloading
三、Reason 3: Blocked by computer antivirus software
3.1、Taking the Windows operating system as an example
3.1.1、How to troubleshoot and confirm
- Check antivirus software logs:
- Open your antivirus software (such as Windows Defender, Avast, Kaspersky etc.)
- View “Quarantine Area” or “Protection Log”
- Search for intercepted records with the keyword “Dicloak”
- Testability troubleshooting:
- Temporarily disable antivirus software (pay attention to network security)
- Retry opening DICloak software, download the kernel, and it will automatically decompress after the download is complete
- If the decompression is successful, confirm that it has been intercepted
3.1.2、Solution
- Add Trust/Allowlist:
- First, delete the kernel that failed to decompress ( view the tutorial below )
- Taking Windows Defender as an example again:
Windows Security Center → Virus & Threat Protection → Manage settings → Exclusions → Add an exclusion- Add: Dicloak cache directory (the cache path can be viewed in DICloak – Personal Settings, and the directory name is .DICloakCache)
- Retry opening DICloak software and downloading the kernel
- For other antivirus software, the DICloak cache directory must be added to the allowlist of the corresponding antivirus software
- Turn off real-time protection (temporary):
- First, delete the kernel that failed to decompress (view the tutorial below)
- Temporarily disable real-time protection before performing the kernel download operation
- Try to open the DICloak software again, download and decompress the kernel, and immediately restore real-time protection after completion
四、Reason 4: Lack of computer system permissions
4.1、Taking the Windows operating system as an example
4.1.1、How to troubleshoot and confirm
- Check installation directory permissions:
- Right-click on the Dicloak cache directory (you can view the cache directory in DICloak – Personal Settings, and the folder name is .DICloakCache)
- Select the “Properties” → “Security” tab
- Check if the current user has “Full Control” permissions
4.1.2、Solution
- Run as administrator:
- First, delete the kernel that failed to decompress ( view the tutorial below )
- Close the DICloak software, right-click on the Dicloak icon
- Select “Run as administrator”
- Retry downloading the kernel and decompressing it
- or change the installation location: In the DICloak APP (Personal Settings > Settings > Profile Cache > Profile cache folder), modify the cache directory path to D:/.DICloakCache or C:/.DICloakCache.
五、How to find and delete kernel files that failed to decompress?
5.1、Taking the Windows operating system as an example
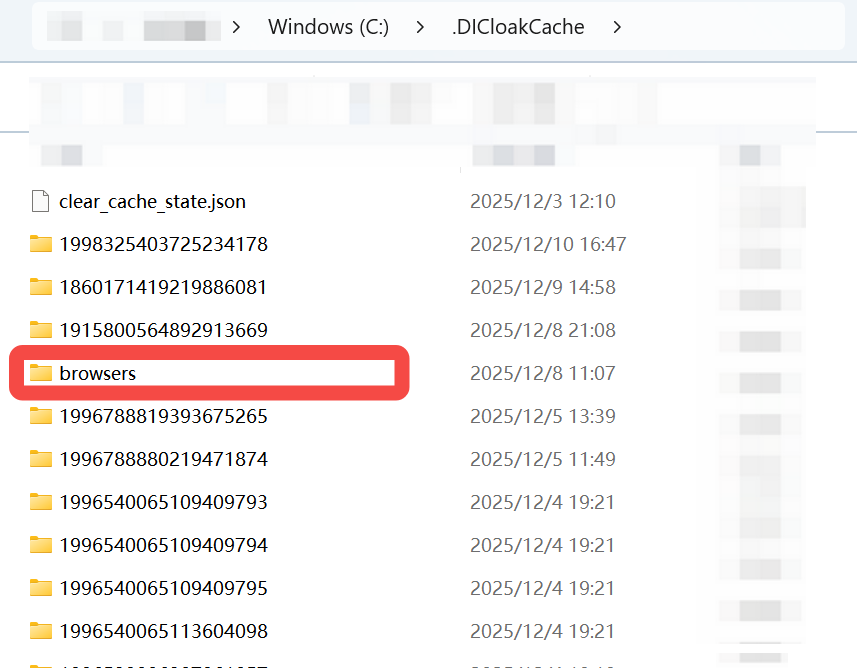
In DICloak – Personal Settings, click to view the Profile cache directory, find the [browsers] folder under this directory, then open it to view the downloaded kernel files, find the folder corresponding to the kernel with extraction failure and delete it, then open the DICloak software to redownload the kernel.If the corresponding version kernel is unknown, delete files starting with 130 or all files.
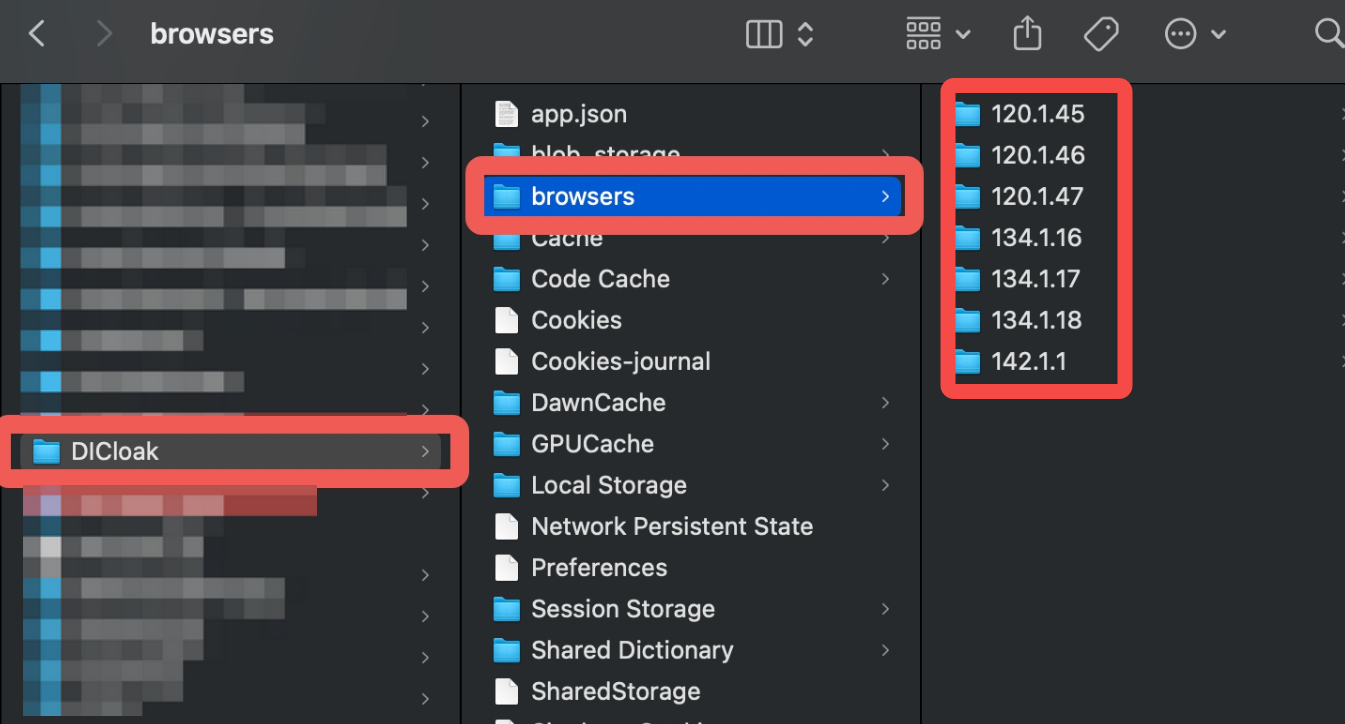
5.2、Taking the Mac operating system as an example
In DICloak – [Personal Settings], click to view the cache directory, then return to the parent directory of the cache file (.DICloakCache), find and open the [DICloak] folder at the same level, find the sub – level [browsers] folder, and then open it to view the downloaded kernel files. Find the folder corresponding to the kernel with a failed extraction and delete it, then open the DICloak software to re – download the kernel