Welcome to DICloak! To help you get familiar with the product as quickly as possible, we have prepared this manual. It will introduce you to the core features in the most direct way. Follow the guide, and you’ll soon be using DICloak like an expert.
🌐 Basic Understanding of DICloak
1. What is a Profile?
In DICloak, you can create multiple browser profiles. Each profile is an independent “digital selves”– it has its own dedicated browser configuration, cache, and fingerprint, just like different versions of you in separate rooms, completely non-interfering. Each digital self can freely explore the web without exposing your real identity. This helps you manage multiple platform accounts.
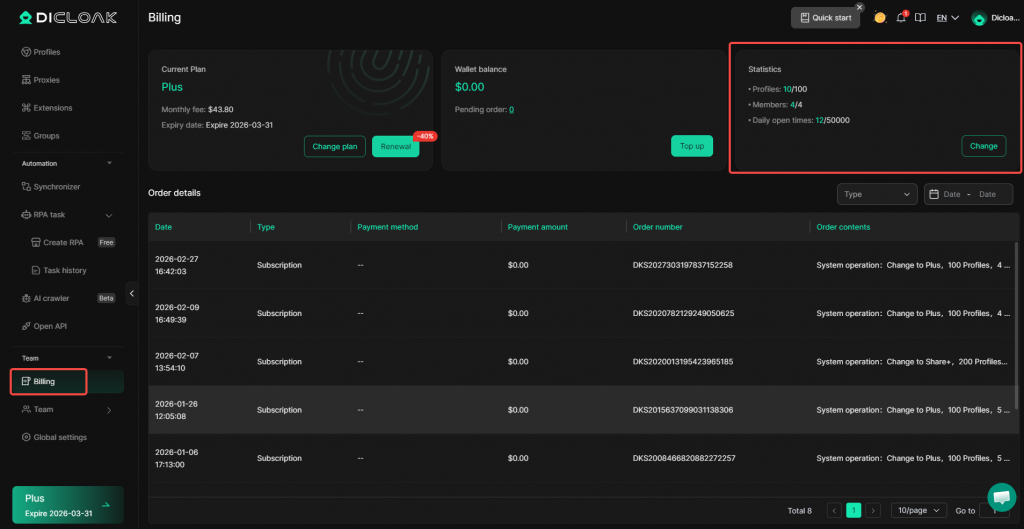
So, how many browser profiles can you create? ——This depends on the number of profile quotas included in your plan. You can view your profile quotas and increase them in Billing Center > Statistics.
2. What is a Browser Fingerprint?
Websites can piece together your “portrait” from information like your User-Agent (UA), screen resolution, fonts, and timezone. This is called a browser fingerprint. DICloak can generate different fingerprints for each profile, making websites think each visit comes from a different device and user.
3. What is a Proxy?
A proxy is an intermediary server located between you and the internet. After configuring a proxy, your network requests will be sent out via the proxy IP, thereby hiding your real IP address and allowing you to simulate network environments from different regions. DICloak supports adding various proxies like HTTP and SOCKS5 with one click. However, please note that DICloak does not provide proxy services. If you need to use proxies, you will need to purchase them yourself.
4. What is a Member Account?
Member accounts are accounts used by other people you invite to join your team. You can assign different permissions to members, allowing them to use or manage specific profiles. The number of member accounts you can create depends on the member quotas purchased in your plan. You can view your member quotas and increase them in Billing Center > Statistics.
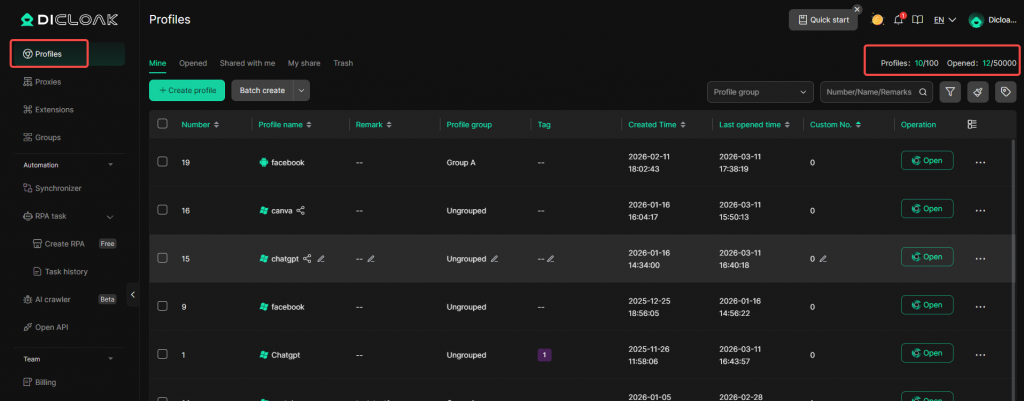
5. What do the “Profiles” and “Opened” values in the top-right corner of Profile list mean?
- “Profiles”: The number of currently created profiles / the maximum number of profiles your current team can create. If you reach the limit for created profiles, you cannot create new ones. You can increase profile quotas in Billing Center > Statistics or delete some existing profiles.
- “Opened”: Counts the number of times all members in the team open profiles on that day (including repeated openings of the same profile). Once the opening limit is reached, profiles cannot be opened again until the next day resets. If you want to increase this limit, you can go to Billing Center > Statistics and increase your profile quotas; the higher the profile quota, the higher the daily opening limit.
👥 Member Account Management
1. What is the difference between Internal Members and External Members?
| Internal Members | External Members | |
| Team Affiliation | Cannot create or join other teams | Can freely create or join other teams |
| Login Method | Admin creates account credentials and provides them to the user for login | Members log in using their own email |
| Password Control | Admin can reset the password at any time | Password is set by the user themselves; admin cannot reset it |
| Login Verification | Can enable 2FA and email verification | Cannot enable login verification |
| Device Management | Admin can view and remove login devices | Admin cannot manage their login devices |
| Access Permissions | Admin can deactivate the account at any time | Admin can deactivate the account at any time, revoking access to this team |
Both internal and external members occupy the team’s member quotas.
2. Can I log in to the same DICloak account on multiple devices simultaneously?
Currently, only internal member accounts with the Plus plan support simultaneous logins on multiple devices (Note: The Super Admin account does not support multi-device login). The Base Plan and Share+ Plan do not support multi-device login.
3. Can I log in to multiple DICloak accounts on the same device at the same time?
Unfortunately, you cannot currently log in to multiple DICloak accounts simultaneously on the same device.
4. What are the differences between various Member Groups?
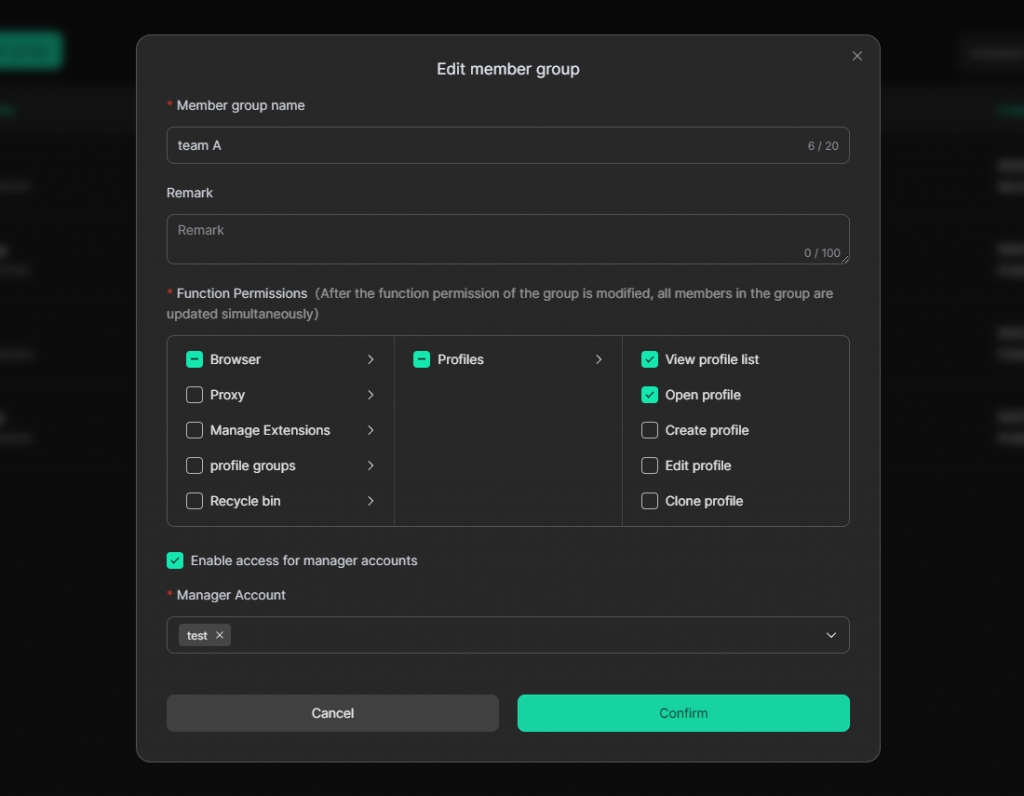
Groups are mainly used for permission management. You can set different functional permissions for different groups, allowing you to finely control members’ operational scope based on their responsibilities. The Admin Group has more functional permissions by default than the Operations Group. You can adjust the permissions of these groups at any time or create new member groups. For detailed guidance, please see: How to Set Member Operation Permissions
What are functional permissions? ——They refer to the functional modules that members can view and operate. For example, if “Proxy” is unchecked, the “Proxies” section will not be displayed on the member’s interface; if “Edit profile” is unchecked, members will not have the “Edit” button for profiles.
5. How to Enable 2FA Verification
Go to Team > Members. Click the “Edit” icon under the Login Verification field to enable 2FA verification. For detailed setup instructions, please refer to this guide: How to Manage Member Accounts
6. How to Assign Profiles to Members?
- First, set up profile groups based on member permissions.
- Go to Team > Members, edit the corresponding member, and select the profile groups that the member can access.
For detailed guidance, please see Part 2 of: How to Assign Corresponding Browser Profiles to Members
⚙️ Profile Settings
1. How to Batch Migrate Profiles from Other Browsers to DICloak?
You can export profile configuration information from other browsers and import it into DICloak. For detailed guidance, please see: How to Migrate Profiles from Other Browsers to DICloak
2. How to Share Tool Accounts with Other Users Without Sharing Passwords?
- Provide member accounts for other users.
- Create a profile, enable the Data Sync feature / bind account passwords, and set up necessary security features.
- The administrator opens the profile, logs into the tool account, and then closes the profile.
- Other members can then open the profile and use the tool without a password.
For detailed guidance, please see: Achieve Account Sharing with DICloak: A 5-Minute Quick Setup Guide
3. Do I Need to Configure a Proxy in My Profile?
DICloak does not mandate proxy configuration; it depends on your purpose of use:
- If you need each profile to use a different IP (e.g., managing multiple e-commerce accounts), it is recommended to configure a proxy to avoid IP association leading to account bans.
- If you need to share tool accounts with members using other IPs, it is recommended to configure a proxy to prevent inconsistent exit IPs that could hinder simultaneous tool usage or create account risks.
- If you have no such requirements and do not need to hide your IP, you can choose not to configure a proxy; in this case, the profile will use your local machine’s IP.
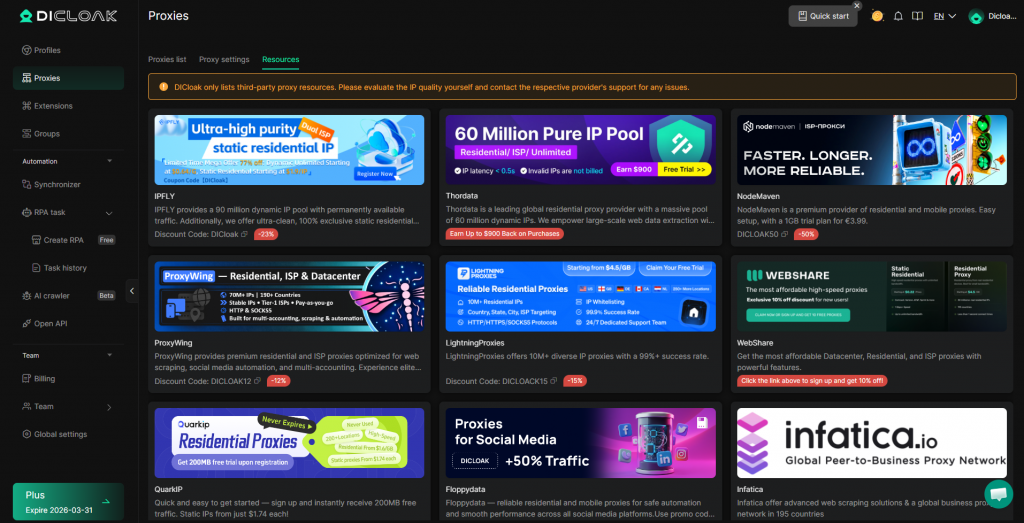
DICloak does not provide proxy services. If you need to configure a proxy, please purchase them yourself first. You can view proxy provider resources on the Proxies > Proxy Resources page. After purchasing, refer to this guide to learn how to configure the proxy: How to Create a Proxy and Configure It in a Profile?
4. What Type of Proxy Should I Use?
Choosing a proxy mainly depends on your business needs:
- Account Sharing / Stable Operation: Use Static Residential Proxies (also known as ISP proxies). The IP comes from real home broadband, is fixed, and the platform will perceive you as a real user operating from a fixed location, offering the highest security.
- Batch Registration / Account Nurturing: Use Dynamic Proxies. The IP changes with each request or at set intervals, simulating a large number of different users and avoiding bans caused by IP repetition.
Choose based on your budget and business needs. DICloak supports all major proxy types and protocols.
5. Can I Create Proxies in Batches and Assign Them to Profiles?
DICloak supports creating proxies in bulk and batch importing them via Excel. After successfully importing all proxies, you can batch assign proxies in Profiles, including randomly assigning proxies and assigning fixed proxies. For detailed operational methods, please see: How to Assign Proxies to Multiple Profiles with One Click?
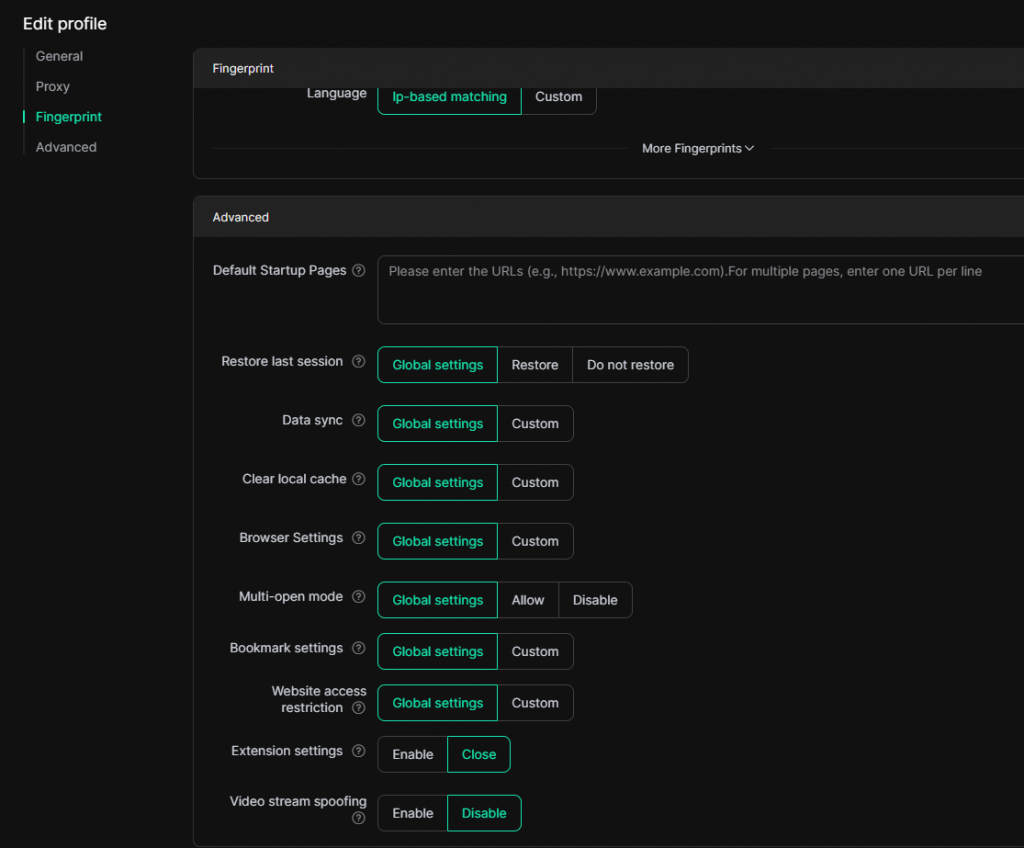
6. What is the Difference Between “Global Settings” and “Custom” in a Profile’s Advanced Settings?
When editing a profile, certain configuration items in the “Advanced Settings” (such as Restore Last Session, Data Sync, Clear Local Cache, Browser Settings, Multi-open mode, Bookmark Settings, Website Access Restrictions) have two options: Global Settings and Custom.
- Selecting “Global Settings”: The profile will follow the unified rules pre-configured in the Global Settings section. For example, if “Multi-open mode” is allowed in Global Settings, this profile will also allow it. This is suitable for scenarios where unified management is desired and repetitive configuration is minimized.
- Selecting “Custom”: You can set these options individually for the current profile. For example, if Global Settings have “Restore Last Session” enabled, you can choose “Do not restore” for this profile to achieve personalized configuration. Custom values only apply to this specific profile and do not affect others.
In short: Global Settings = Follow team rules; Custom = Set rules individually for this profile.
7. How to Add Extensions to a Browser Profile?
- First, add extensions in Extensions. Supported methods include adding via the Chrome Store’s extension URL or uploading an installation package. You can also add extensions directly from the Extension Marketplace.
- Go to Profiles > Edit Profile. In the Extension settings, select the extension group containing the extensions you want to add.
For detailed setup procedures, please see: How to Add Extensions and Apply Them to Profiles?
🔒 Security Feature Settings
1. How to Prevent Members from Logging Out of Tool Accounts Inside the Browser?
When a member logs out of a tool account, the cookies are updated and synced to the cloud, causing other users of that profile to also be logged out. To prevent the impact of such logouts, there are currently two effective methods:
1.Hide the Logout Button
Use the “Web Element Hider” extension to hide the logout button on the website. Members cannot click the logout button, thus cannot actively log out. Specific operational steps: Web Element Hider Guide
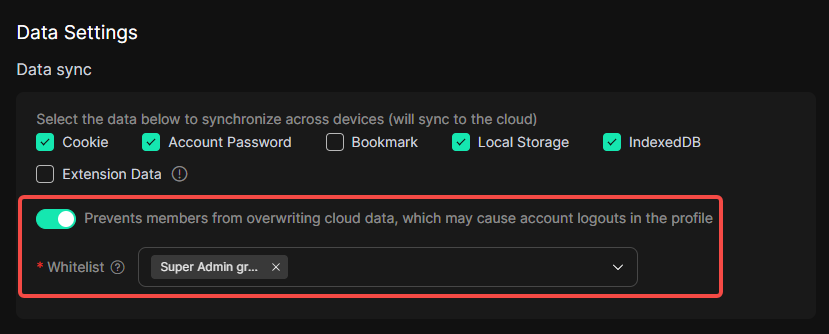
2.Utilize Data Sync Permission Control
In Global Settings > Data Sync Settings, enable the “Prevent Members from Overwriting Cloud Data” function, and set the Super Admin Group or Admin Group as the whitelist. This way, only cookie changes from members within the whitelist are uploaded to the cloud. Logout operations by regular members will not overwrite the cloud login status, so other members entering the profile will remain logged in.
2. How to Restrict Members from Accessing Certain URLs?
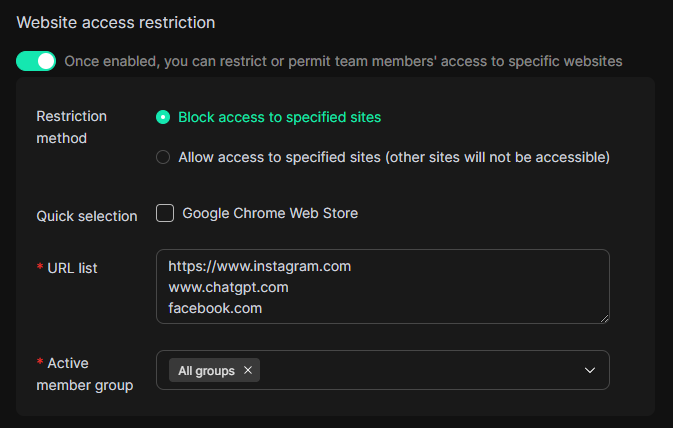
In Global Settings > Website Access Restrictions, configure it by following these steps:
- Choose Restriction Mode
- Block Access to Specified Sites: Members cannot access the URLs listed below (Blacklist Mode).
- Allow Access to Specified Sites: Members can only access the URLs listed below; all others are blocked (Whitelist Mode).
- Add URL List
In the “URL List” field, enter the domain names or full links you want to restrict (e.g.,https://www.instagram.com/accounts/edit/). Supports one entry per line. - Select Applicable Member Groups
At the bottom, select which member groups this rule applies to (you can specify all groups or specific groups).
After configuration, when members in the specified groups attempt to access matching URLs within a profile, they will be automatically blocked.
3. How to Restrict Members from Accessing Certain Pages?
There are two methods to achieve this; choose based on your needs:
- Use the “Web Element Hider”: Hide page elements using this extension. For example, by hiding buttons like “Account” or “Settings” to restrict members from entering those pages. If you are using platforms like ChatGPT that use anchor URLs, this method is recommended. Specific operational steps: Web Element Hider Guide
- Website Access Restrictions: By adding specific page links (e.g.,
https://www.instagram.com/accounts/edit/) under “Block Access to Specified sites”, you can prevent members from opening that page. Specific operational steps: Restrict Team Members from Accessing Websites
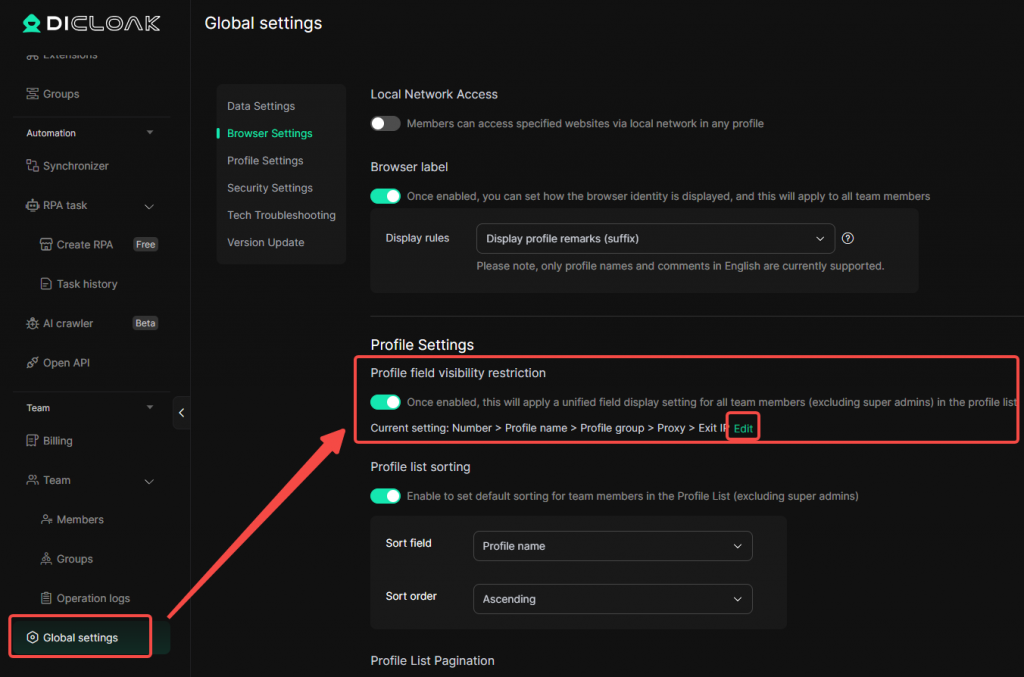
4. How to Restrict the Visibility of Fields in a Member’s Profile List?
In Global Settings > Profile Field Visibility Restrictions, enable the feature and set the field information visible to members. You can also sort the fields.